
How to Provide Large Scale Static Data in AWS Batch
July 12, 2024Problem
Running your big data analytics in AWS Batch is a great way to scale your data processing. However, some jobs require large static datasets to be available in the job container. There are several ways to provide this data.
One solution can be to download the data from an S3 bucket at the beginning of the job execution. This solution works well for small data sets. However, for large data sets, this solution is not scalable. The data transfer can take a long time and the data transfer can be a bottleneck for the job execution.
Another solution can be to provide the data in the job container image. This solution also works well for small data sets, but it also couples the analytics application with the data. This can make the application harder to maintain and update. Also, larger images in AWS Elastic Container Registry (ECR) will increase the costs.
We could also provide the data via Amazon Elastic File System (EFS). This solution typically works well if there are not too many containers accessing the files in parallel. However, for large scale data processing, EFS can become a bottleneck as each file system has a limit on the number of operations per second. If you attach the same EFS file system to too many containers, you can quickly reach this limit. We can get around this by providing more than one file system, but this makes the solution more complex, harder to maintain, as well as more expensive.
In this article we focus on a different solution. We show how to provide large scale static data in a scalable way. The life-cycle of the data will be decoupled from the analytics application.
Overview
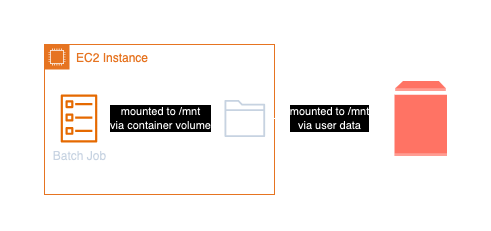
The solution is to provide the data via Amazon Elastic Block Store (EBS) volumes. EBS volumes are block storage volumes that you can attach to your EC2 instances. You can create a snapshot of the data and create EBS volumes from this snapshot. This is a feature built into Amazon EC2. An EC2 Launch Configuration can be used as a form of blueprints for the EC2 instances. You can also define EBS volume attachment from snapshots. The Launch Configuration can be used in the AWS Batch Compute Environment to define how the EC2 instances are started. There is one pre-requisite for this solution. Your AWS Batch Compute Environment must be set up to use Amazon EC2 instances. This solution will not work with AWS Fargate. But as AWS Batch fully manages your compute environment, you can can set the minimum number of CPUs and memory to zero. Batch will terminate the EC2 instances when there are no jobs to run and in turn start instances if there are jobs to be scheduled on the cluster.
Step-by-step guide
Here is a step-by-step guide on how to provide large scale static data in AWS Batch:
- Create an EBS volume and fill it with the static data.
- Create a snapshot of the EBS volume.
- Create an EC2 Launch Configuration with the EBS volume attachment. This step also requires to define user data for the EC2 instance to mount the EBS volume.
- Create an AWS Batch Compute Environment that uses the Launch Configuration
- Create an AWS Batch Job Definition that mounts the EBS volume in the job container
Step 1 and 2
These steps are a one-time setup and are not covered in this article. Briefly, you can create an EC2 instance, attach an EBS volume, fill it with the data, and create a snapshot of the EBS volume.
Step 3: Create an EC2 Launch Configuration to be used by the AWS Batch Compute Environment
The following CDK code creates an EC2 Launch Configuration with an EBS volume attachment. The EBS volume is created from a snapshot.
const diskDeviceId = "/dev/xvdb";

const userData = new ec2.MultipartUserData();

const mountPartition = ec2.UserData.forLinux();
mountPartition.addCommands(`mount ${diskDeviceId} /mnt`);
mountPartition.render();

userData.addUserDataPart(mountPartition);

const launchTemplate = new ec2.LaunchTemplate(this, "BatchEC2LaunchTemplate", {
  userData,
  blockDevices: [
    {
      deviceName: diskDeviceId,
      volume: ec2.BlockDeviceVolume.ebsFromSnapshot(props.snapshotId),
    },
  ],
});
First, we define how the device will be named in the EC2 instance. In this case, we use /dev/xvdb. Then we define the
user data that will be executed when the EC2 instance is started. This is just a simple bash script mounting
the EBS volume at /mnt. The EBS volume is created from the snapshot with the ID props.snapshotId.
Step 4: Update the AWS Batch Compute Environment to use the Launch Configuration
The following CDK code creates an AWS Batch Compute Environment to use the Launch Configuration.
const computeEnvironment = new batch.ManagedEc2EcsComputeEnvironment(
  this,
  "Ec2ComputeEnv",
  {
    vpc,
    instanceClasses: [ec2.InstanceClass.C7I],
    launchTemplate,
  }
);
The launchTemplate is the Launch Configuration created in Step 3. The vpc is the VPC where the EC2 instances will be
started. The instanceClasses define the instance types that can be used by the Compute Environment.
The launch template is used to define how the EC2 instances are started. The EBS volume attachment is defined in the
launch template in step 3.
Step 5: Create an AWS Batch Job Definition that mounts the EBS volume in the job container
The following CDK code creates an AWS Batch Job Definition that mounts the EBS volume in the job container.
const sharedVolume = new batch.HostVolume({
  name: "sharedVolume",
  hostPath: "/mnt",
  containerPath: "/mnt",
  readOnly: true,
});

new batch.EcsJobDefinition(this, "StaticDataList", {
  container: new batch.EcsEc2ContainerDefinition(
    this,
    "StaticDataListContainer",
    {
      image: ContainerImage.fromRegistry("busybox"),
      command: ["ls", "-l", "/mnt"],
      cpu: 1,
      memory: Size.mebibytes(512),
      executionRole,
      volumes: [sharedVolume],
      logging: new ecs.AwsLogDriver({
        streamPrefix: "StaticDataList",
        logGroup: new logs.LogGroup(this, "StaticDataListLogGroup", {
          retention: 7,
          logGroupName: "/aws/batch/static-data-list",
        }),
      }),
    }
  ),
});
The sharedVolume is a host volume (mounted to /mnt in the EC2 host machine, in our case) that mounts the EBS volume
at /mnt in the job container. The shared volume is also defined as read-only (something you should do, the data will not
be saved anyway but rather recreated from snapshot for the next run).
The EcsJobDefinition defines the job that will be executed in AWS Batch. The job uses the busybox
image and lists the files in the /mnt directory. The volumes property of the EcsEc2ContainerDefinition defines the
volumes from the EC2 host instance that are mounted in the job container. In this case, we mount the hosts /mnt directory
to the /mnt mount point in the container. The logging property defines the logging configuration for the job.
Conclusion
In this article, we showed how to provide large scale static data in AWS Batch. The solution is to provide the data via EBS volumes. The lifecycle of the data is decoupled from the analytics application. The data is provided in a scalable way and is available in the job container. There is no need to download the data at the beginning of the job execution. The data is available in the job container right from the start and the creation of the EBS volumes from the provided snapshot is very fast.
Compared to using EFS, this solution is more scalable as you have one volume per EC2 instance instead of one file system for all containers. Still, if you have many containers accessing the data in parallel, you might run into the limits of the EBS volume. In this case, you can provide more than one EBS volume in the Launch Configuration and mount them in the job container or simply restrict which machine types can be used by the AWS Batch Compute Environment to smaller instance types. This way there would be fewer containers per host and thus less contention for the EBS volume.

With over a decade of hands-on AWS experience and certifications spanning Developer to Security Specialty, Robert works as a Cloud Consultant at superluminar. Here, he shares stories and insights from his work — from serious AWS challenges to playful experiments and everything in between.